
Testing 101 in JavaScript: Beginner Friendly

Have you ever encountered, a situation, where you have two functions,
f1andf2, and on running the script, you found,f1working as expected, butf2is not working? So after few minutes of debugging, you finally fixedf2and pushed the code! Wait, but did you recheckf1, whether it's working or not, after fixingf2??
So obviously, most of us do this mistake. And Junior Devs/ Student Developers like us, have learned from this mistake, but we still do it, but less frequently.
So today I will be discussing, with you about Testing in JavaScript and will be performing some live testing with you. Don't worry, if you are just getting started, with testing. This will definitely, help you to know about testing.
What do you need? A Browser and an editor.
Lets taste (test)!!

There are a lot of techniques, for testing, we are going to use one of the techniques, known as Behavior Driven Development orBDD`.
In simple words, it means,
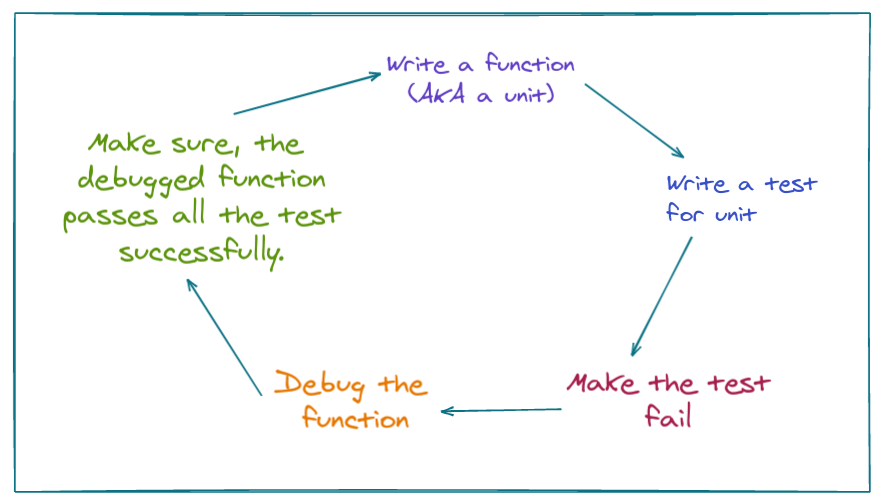
We are going to have a function
(we will be calling it a unit), and we will be having a test file, which will describe the tests, for that particularunit.Next, we will make sure, that the tests fail, and then debug/re-implement the
unitonce again.Finally, after debugging, we will verify that the latest implementation of the
unitpasses the tests successfully.(Optional) Repeat the same stuff, for other units(here as functions).
Writing test files, and performing tests, also known as automated testing in which tests are written separately, in addition to the code. They run our functions in various ways and compare results with the expected.
So we are going to follow a practical approach to learn about the basics of testing.
We have to create a function pow(x,n) which returns, the value of, x to the power of n.
In Javascript, we do have an operator
**which does the work, but we are here to learn the basics of testing, henceforth, this will be our example, which makes sure, things are beginner-friendly.
So before creating the code for function, pow we are going to imagine what the function should do and describe it. This writing of description, also known as specification or specs. It is just another fancy word, which is just a way how we want to describe our test function, like its name or what the test does.
The following code snippet shows, how a specification for our pow function looks like.
describe("pow", function() {

  it("raises to n-th power", function() {
    assert.equal(pow(2, 3), 8);
  });

});
Three things to note, there are three basic components of the specification.
describe("title", function() { ... }): We use this to describe the function/ unit we are going to test.it("the-exact-use-case", function() { ... }): If you are completely new to this,use cases, means situations, or can be the actions. here our use case is raises to nth power.assert.equal(value1, value2): The code insideitblock, if the implementation is correct, should execute without errors. Functionsassert.*are used to check whetherpowworks as expected.
Now let's do something Live with this information.
Live Testing
We will be using the following famous JS Libraries, which provides us describe and it functions.
Mocha- the core framework: it provides common testing functions including describing and it and the main function that runs tests.
Chai – the library with many assertions. It allows us to use a lot of different assertions, for now, we need only assert.equal.
Next, now this will be file system.
--directory
      |___ index.html
      |___ test.js
We will be having an index.html file with all our mochajs, and chaijs, imported.
And we will be having test.js where we are going to do our BDD testing.
Your index.html should look like this.
<!DOCTYPE html>
<html>
<head>
  <!-- add mocha css, to show results -->
  <link rel="stylesheet" href="https://cdnjs.cloudflare.com/ajax/libs/mocha/3.2.0/mocha.css">
  <!-- add mocha framework code -->
  <script src="https://cdnjs.cloudflare.com/ajax/libs/mocha/3.2.0/mocha.js"></script>
  <script>
    mocha.setup('bdd'); // minimal setup
  </script>
  <!-- add chai -->
  <script src="https://cdnjs.cloudflare.com/ajax/libs/chai/3.5.0/chai.js"></script>
  <script>
    // chai has a lot of stuff, let's make assert global
    let assert = chai.assert;
  </script>
</head>

<body>

  <script>
    function pow(x, n) {
      /* function code is to be written, empty now */
    }
  </script>

  <!-- the script with tests (describe, it...) -->
  <script src="test.js"></script>

  <!-- the element with id="mocha" will contain test results -->
  <div id="mocha"></div>

  <!-- run tests! -->
  <script>
    mocha.run();
  </script>
</body>

</html>
- Under the
headtag, we have imported, the libraries needed. - Under the
bodytag, the first script, defines our functionpowwhich is right now empty. - Next, we are referencing our
test.jsfile. - A
divwith id as mocha, will help mochaJS, to show the output - At the end, the tests are started by the command
mocha.run()
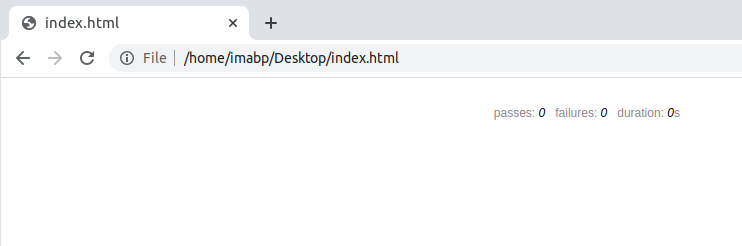
If you run index.html you will be seeing something similar like this.
Initial Implementation of the Unit
So as said earlier, the function pow we will be calling a unit.
So initially, we are implementing the code for pow like this.
function pow(x, n) {
    return 8;
}
And test.js containing, the following test.
describe("pow", function() {

  it("raises to n-th power", function() {
    assert.equal(pow(2, 3), 8);
  });

});
Refresh the browser, and you can see an output similar to this.
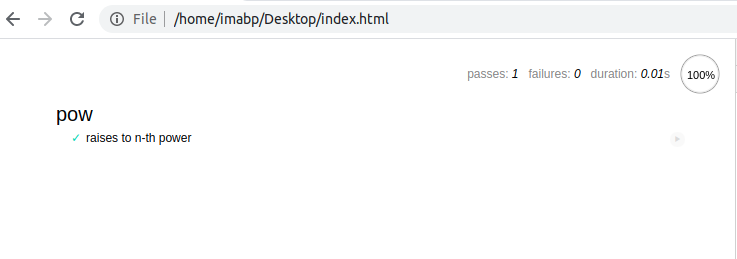
Here if you see, the test is successful, we are just having one test case, but the pow function is completely a cheat, as it returns 8 for every value of x. So we need to improve on the specs or in other words, the test.js
Improving the spec
As we know, we have done a cheat in our pow function. So we will be using the test.js file to show us, the failing tests.
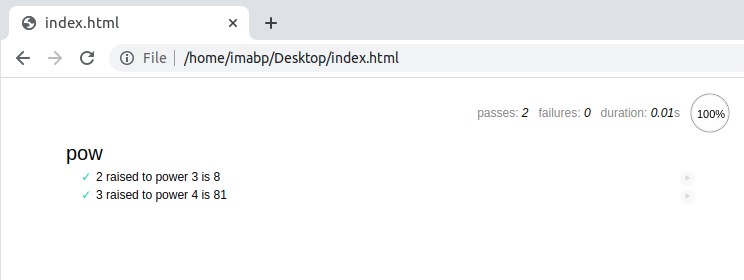
Let's go to the test.js file, and improve our spec to the following.
describe("pow", function() {

  it("2 raised to power 3 is 8", function() {
    assert.equal(pow(2, 3), 8);
  });

  it("3 raised to power 4 is 81", function() {
    assert.equal(pow(3, 4), 81);
  });

});
Saving the test.js file, and refresh your browser, you will be certainly getting something similar to this.

Debugging the unit
Now it's time to re-implement the function pow.
Head over to index.html and under script tag, write the following code.
function pow(x, n) {
  let result = 1;

  for (let i = 0; i < n; i++) {
    result *= x;
  }

  return result;
}
So we have improved our implementation, lets refresh our browser. And if all the debugging done correctly, you are going to see something like this.
And yes we have successfully, tested our code. But still, there is a lot to improve in the specification. The following specification should be the more precise one to follow.
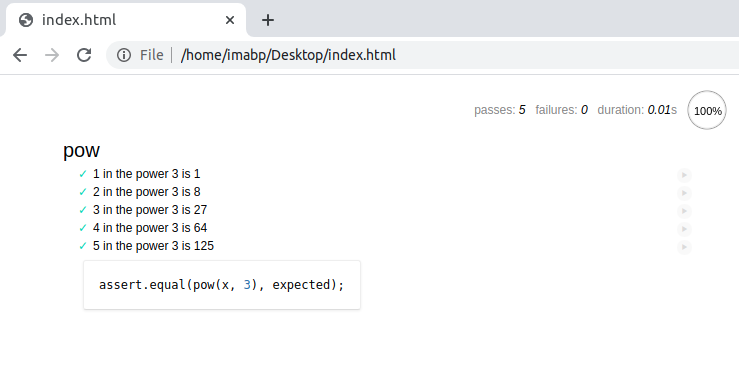
describe("pow", function() {

  function makeTest(x) {
    let expected = x * x * x;
    it(`${x} in the power 3 is ${expected}`, function() {
      assert.equal(pow(x, 3), expected);
    });
  }

  for (let x = 1; x <= 5; x++) {
    makeTest(x);
  }

});
Refresh your browser, and you are certainly, going to see the following output.
Congratulations 🎉🎉🎉
Finally, you made it. Testing is the most important phase in software engineering, it helps to write good and maintainable software. Also, when you contribute to various open-source organizations and in fact even working as a junior developer or Software Engineering Intern, you are supposed to write, test cases, for your code.
There are a lot of techniques, involved in testing. The most widely used is Test Driven Development, or TDD. You can know more by following some amazing people who do TDD, like @dmokafa


